How to Save Screenshots to OneDrive Directly
If you have the OneDrive desktop client installed on your computer, you can save your screenshots directly to your OneDrive account. It not only helps you save the screenshots on the cloud but also allows you to access them whenever you want. All you need to do is enable a small setting in the OneDrive client and the system automatically saves the screenshots for you. Follow these simple instructions to begin saving screenshots/screen-captures to OneDrive or OneDrive for Business.
Step 1: Locate the OneDrive Icon in the Notification Area
Go to the Windows notification area and find the OneDrive icon. If the OneDrive icon is not present here, it means the app is not running. In that case, you may have to open the app from the Start menu.
![]()
Step 2: Right Click on the OneDrive Icon
Now, right-click on that icon. Look out for the Help & Settings option and click on it.

Step 3: Click on Settings
Locate the Settings tab within the Help & Settings options and click on it.

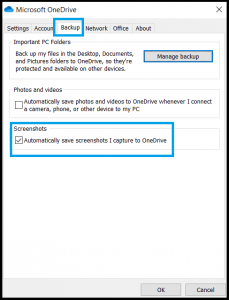
Step 4: Click on the Backup Tab
On the Backup tab, check the “Automatically save screenshots I capture to OneDrive” box. By doing so, you are allowing OneDrive to save screenshots from the clipboard. Those screenshots can be accessed at “OneDrive/Pictures/Screenshots” later.

We hope you found this article on OneDrive helpful.

Leave A Comment